How Do You Tie a Taut-Line Hitch Knot? (The Only Way You’ll Ever Need to Know)
Hey friend, welcome back to the woods.
You need a line that stays tight but lets you adjust the tension whenever the wind picks up or the tarp sags. Then the taut-line hitch is the knot for you.
It slides freely when you want to tighten or loosen it, yet locks solid under tension. That makes it perfect for guy lines, ridge lines, and any situation where conditions change. Plus, you can tie it quickly once you get the feel for it.
In this guide I show you exactly how to tie a taut-line hitch. I keep the steps slow and clear. I also share the history behind it, the best uses, common mistakes, and real backwoods tips from years of use.
What Is a Taut-Line Hitch Knot Used For?
You can use it for many camp tasks.
- Adjusting tarp and tent guy lines
- Securing ridge lines that need tightening
- Making adjustable loops for hanging gear
- Any situation where you need a loop that can slide but then lock under tension
It adjusts in seconds. It holds firm once tension hits it. So it works well whenever weather or loads keep changing.
A Little History Behind the Taut-Line Hitch Knot
The taut-line hitch is a relatively modern knot that grew out of older nautical hitches. People also call it the tent-line hitch, rigger’s hitch, or adjustable hitch.
It comes directly from the rolling hitch. The first printed mention of the name “taut-line hitch” appears in Howard W. Riley’s 1912 book Knots, Hitches, and Splices. Riley showed it in its rolling-hitch form and recommended it as a handy stopper knot.
By 1948 the 5th edition of the Boy Scout Handbook included a clear illustration of the knot and helped popularize it among campers and outdoorsmen. The version most people learn today matches Ashley Book of Knots #1856.
Astronauts even used a taut-line hitch during the 1997 STS-82 Space Shuttle mission while repairing the Hubble Space Telescope.
Citation: Taut-line hitch. (2026). In Wikipedia. Retrieved April 1, 2026, from https://en.wikipedia.org/wiki/Taut-line_hitch
Campers, sailors, and riggers have trusted this knot for over a century. It gives you easy adjustability and solid holding power. So it remains one of the most practical knots for real-world outdoor use.
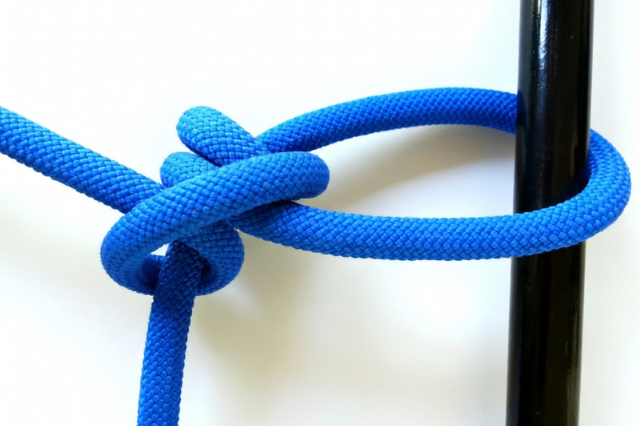
How to Tie a Taut-Line Hitch Knot – Step-by-Step
Setup Wrap the rope around your anchor point (tree, stake, or ring) so you have a standing rope and a working end.
Steps
1. Hold the standing rope (the long fixed part) with your left hand. Take the working end and wrap it around the standing rope twice, moving toward the anchor. Keep the wraps neat and side-by-side so they sit on top of the standing rope.

2. Bring the working end back toward the standing rope. Pass it over the standing rope, then tuck it under both of the wraps you made in step 1. Pull it through so the working end now points away from the post.

3. Now take the working end and wrap it once more around the standing rope, but this time on the outside of the two wraps you made earlier. This creates the third wrap.

4. Slide the working end through the small loop you just created between the second and third wraps. You should now feel three distinct wraps around the standing rope.

5. Hold the standing rope firmly with one hand and the working end with the other. Pull steadily in opposite directions. You will feel the knot slide freely along the standing rope when there is no tension, but it will lock tight and hold firmly once tension is applied.

Checkpoints
- You should see two inner wraps and one outer wrap.
- The knot should slide when loose and lock when pulled.
Lock It In Pull the standing rope to set tension. Then slide the knot to adjust.
Common Mistakes & How to Fix Them
Many people make the wraps in the wrong direction. Then the knot will not slide or lock properly.
Others pull the working end through in the wrong spot. So the third wrap never forms and the hitch slips.
Finally, some use it with very slick or very stiff rope. In that case the knot may not grip well. Test it with a firm tug before you trust it with important loads.
Backwoods Tip This is my go-to knot for tarp guy lines. Weather changes, wind picks up, things sag — I fix all of it in seconds without untying anything. Once you get the feel for it, you will start using it everywhere you need quick adjustments. I have left tarps up for days in pouring rain and simply slid the knot tighter each morning.

Want More Easy Knots?
You just learned knot #4 of my 8 Essential Survival Knots.
If you liked this guide, grab the free PDF with all eight knots right here:
Download Backwoods Bob’s 8 Essential Survival Knots PDF
Or check out the next post in the series when it goes live.
Stay safe out there, keep your rope handy, and I’ll see you in the next one.
— Backwoods Bob
gridfreelife.com