How Do You Tie a Bowline Knot?
Hey friend, welcome back to the woods.
If you’ve ever needed a strong, fixed loop that won’t slip or tighten under load — whether you’re hanging a bear bag, tying off a tarp in the wind, or making a quick rescue loop — the bowline is the knot you want.
It’s been called the “King of Knots” for hundreds of years because it’s incredibly strong, easy to tie, and still comes apart without a fight even after being soaked and loaded for days.
In this guide I’ll walk you through exactly how to tie a bowline the right way — slow, clear, and with all the little tactile cues I use when I’m teaching someone in person.
I’ll also share the history behind it, what it’s best used for, the most common mistakes people make, and a few real backwoods tips from someone who’s tied thousands of them.
What Is a Bowline Knot Used For?
- Creating a secure rescue loop or harness
- Tying off tarps, shelters, or ridge lines
- Securing loads or gear to trees/posts
- Making a non-slip loop for any purpose
It’s fast, strong under heavy load, and easy to untie when you’re done — exactly the kind of practical knot we need out here.
A Little History Behind the Bowline Knot
The bowline is one of the oldest and most trusted knots in human history. Its name comes from the Age of Sail, where a “bowline” was the rope used to hold the edge of a square sail toward the bow of the ship.
It is thought to have been first mentioned in John Smith’s 1627 book A Sea Grammar under the name “Boling knot,” where Smith described it as strong and secure for fastening sails. Some archaeologists believe an even earlier example was found on the rigging of Pharaoh Khufu’s solar ship from the 26th century BC.
Citation: Bowline. (2026). In Wikipedia. Retrieved April 1, 2026, from https://en.wikipedia.org/wiki/Bowline
It’s been a favorite of sailors, climbers, and outdoorsmen for centuries because it gives you a reliable fixed loop that never slips, yet still unties easily — a rare combination in the knot world.
How to Tie a Bowline Knot – Step-by-Step
Setup Hold the standing rope (the long fixed part) in your left hand. Use your right hand for the working end (the free end).
Steps
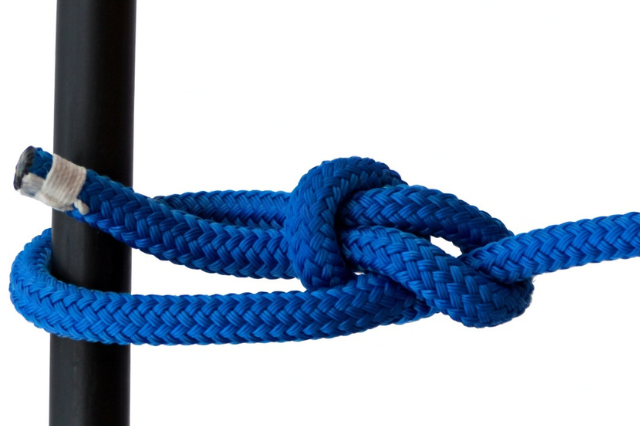
- Make a small loop in the standing rope • The working end should point up. This small loop is your “hole.” You should be able to feel the rope crossing itself cleanly.

2. Push the working end up through the loop from underneath, you should now feel the working end coming out the top of the hole.

3. Take the working end and pass it behind the standing rope • Bring it all the way around the front of the standing rope so it goes completely around it.

4. Now bring the working end back down through the same hole it originally came out of, you will feel the rope naturally forming a loop around the standing part.

5. Hold the standing rope firmly with one hand and the working end with the other

6. Pull steadily in opposite directions until the knot tightens and the loop becomes firm and secure

Checkpoints
- You should see a fixed loop that does not slide
- The knot should look compact and clean
- If the loop tightens when pulled, it’s tied wrong
Lock It In Hold the loop and pull the standing rope firmly to set it.
Common Mistakes
- Making the small loop the wrong way (working end pointing down) → the knot won’t form correctly.
- Not bringing the working end all the way around the standing rope → the loop will slip.
- Pulling too hard on the working end before the knot is dressed → you get a twisted, weak version.
Backwoods Tip
The Bowline is the knot I reach for more than anything else. Hanging a bear bag, tying off a tarp in the wind, or making a quick rescue loop — it just handles it. Even after being wet and loaded overnight, it still unties without a fight. I’ve trusted my life to it more times than I can count.
For quick pole ties check the Clove Hitch, and for adjustable tension lines try the Taut Line Hitch.

Want More Easy Knots?
You just learned knot #2 of my 8 Essential Survival Knots.
If you liked this longer, no-fluff guide, grab the free PDF with all eight knots right here:
Download Backwoods Bob’s 8 Essential Survival Knots PDF
Or check out the next post in the series when it goes live.
Thank you for reading How Do You Tie a Bowline Knot, Stay safe out there, keep your rope handy, and I’ll see you in the next one.
— Backwoods Bob
gridfreelife.com