How Do You Tie a Constrictor Knot? (The Only Way You’ll Ever Need to Know)
Hey friend, welcome back to the woods.
You need something bound so tightly it will never slip or come loose. Then the constrictor knot is the one you want.
It tightens like a noose and grips harder than almost any other binding knot. People often call it “nature’s zip tie” because it locks down so hard you sometimes have to cut the rope to remove it.
In this guide I show you exactly how to tie a constrictor knot. I keep the steps slow and clear. I also share the history behind it, the best uses, common mistakes, and real backwoods tips from years of use.
What Is a Constrictor Knot Used For?
You can use it for many camp and survival tasks.
- Whipping the end of a rope to stop it from fraying
- Binding bundles of sticks, tools, or gear
- Securing a tarp or shelter very tightly
- Temporary hose or pipe clamps
- Any situation where you need a very strong, non-slip binding
It holds so tightly that it is almost impossible to untie once set. So it works well whenever you want something locked down for good.
A Little History Behind the Constrictor Knot
The constrictor knot is a relatively modern knot that became widely known in the 20th century. Clifford Ashley first named it the “constrictor knot” in his 1944 book The Ashley Book of Knots.
Although Ashley seemed to think he had invented it more than 25 years earlier, research shows the knot likely existed long before.
An earlier version may have appeared as the “gunner’s knot” in the 1866 book The Book of Knots by Tom Bowling.
Regardless of its exact origin, Ashley’s book popularized the knot and made it a favorite among campers, sailors, and outdoorsmen.
Today it remains one of the strongest and most useful binding knots you can learn.
Citation: Constrictor knot. (2026). In Wikipedia. Retrieved April 1, 2026, from https://en.wikipedia.org/wiki/Constrictor_knot
Campers, sailors, and woodsmen have trusted this knot for decades. It gives an incredibly tight bind that is as simple to tie as a clove knot, yet almost impossible to loosen. So, it remains one of the most practical knots for real backwoods work.
How to Tie a Constrictor Knot – Step-by-Step
Setup Hold the standing rope (the long fixed part) in your left hand. Take the working end (the short free end) in your right hand. Place the rope against the object you want to tie.
Steps
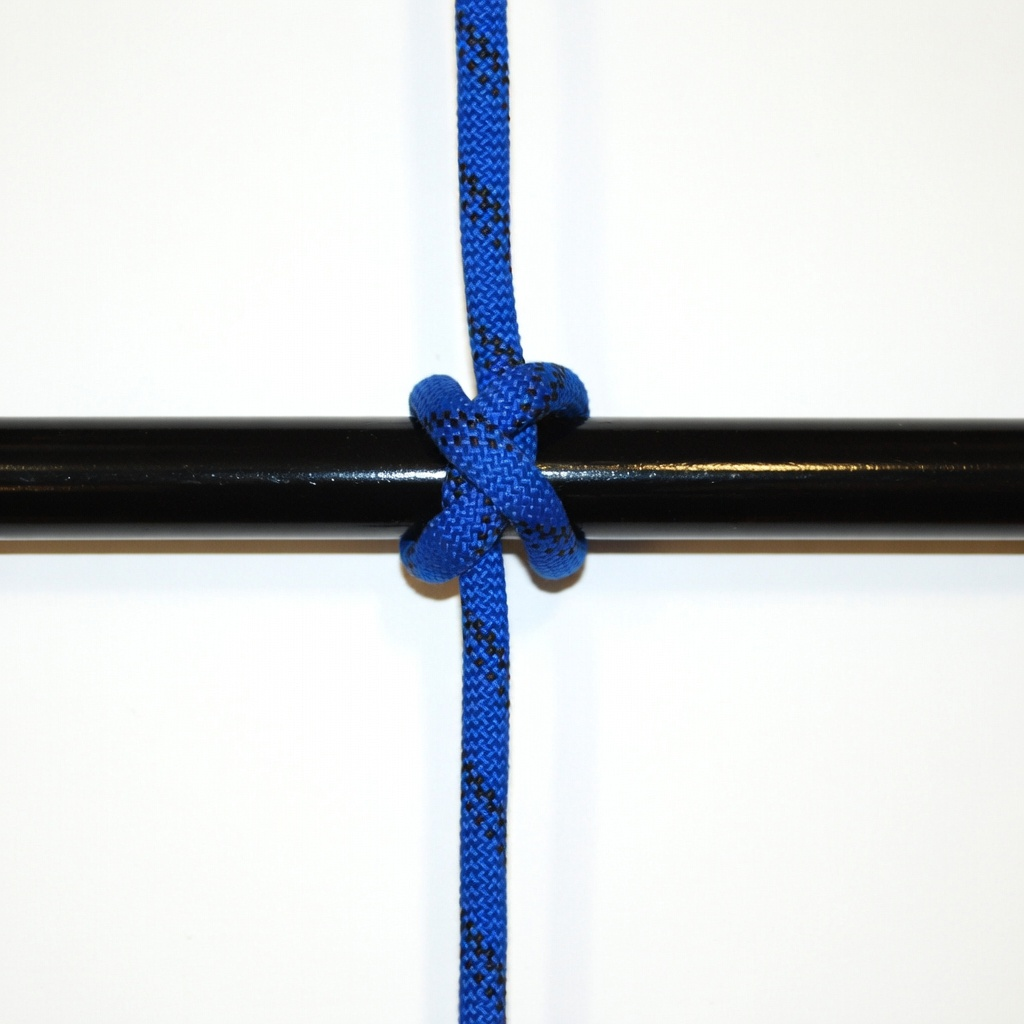
1. With your right hand, take the working end and begin wrapping it around the object. Continue wrapping so you go past the starting point and cross down to under the first wrap, making the cross (the “X”).

Keep holding the standing rope steady with your left hand.
2. With your right hand, take the working end and continue wrapping it around the object a second time underneath the first wrap until you are back at the “X”.

3. Cross the working end over the standing rope and under the X so it comes out between the 2 wraps.

Hold the standing rope firmly with your left hand and the working end with your right hand.
4. Pull both ends steadily in opposite directions. You will feel the knot suddenly tighten and squeeze very hard around the object.

5. Tug firmly on both ends to fully set the knot. The constrictor should now feel extremely tight and locked in place.

Checkpoints
- You should see a tight “X” with the end tucked underneath.
- The knot should feel very tight and not move.
Lock It In Pull hard on both ends to fully cinch it down.
Common Mistakes & How to Fix Them
- Many people do not cross the rope far enough to form a clear “X”. Then the knot will not lock tightly.
- Others forget to tuck the working end under the crossing point. So the hitch slips instead of gripping.
- Finally, some stop pulling before the knot is fully tightened. In that case the constrictor stays loose. Always pull hard on both ends until you feel it bite down like a zip tie.
Backwoods Tip I only use the constrictor knot when I want something locked down for real. Once you cinch it tight, it is not slipping, shifting, or coming loose. Be ready though — most of the time you will not untie it… you will end up cutting it off. I have used it to whip rope ends, bind tool handles, and secure tarps so tight they laugh at the wind.

Want More Easy Knots?
You just learned knot #8 of my 8 Essential Survival Knots.
If you liked this guide, grab the free PDF with all eight knots right here:
Download Backwoods Bob’s 8 Essential Survival Knots PDF
Or check out the next post in the series when it goes live.
Stay safe out there, keep your rope handy, and I’ll see you in the next one.
— Backwoods Bob
gridfreelife.com